Welcome to TRICARE overseas. In this video, you will learn how to register for a new provider account. If you are not registered, don't worry at all. The process is very easy. To begin, go to our home page and locate the login button. Click on the "create a provider account" link on top. You are now just four steps away from getting your own account. In step number one, we ask you to enter some information related to your provider ID. Don't forget to read and click on accept the terms and conditions of this portal. Now, please enter the claim number or invoice number along with the patient's date of birth for a claim that has processed in the last 365 days. The claim number is located on your explanation of benefits (EOB) and must be for the location you were requesting access to. The invoice number is the provider's internal tracking number that the provider's office assigned to the claim. Once you've entered this information, click continue. Now that we have your information, it's time to create your account. Just follow the username and password rules to create them. Select a security question and provide an answer to that specific security question. Now click continue. If you've reached step number four, it means that you have successfully completed your registration and created your own account. To access this site, just click on "go to dashboard". And remember, you will need to enter these new credentials every time you want to log in. We've reached the end of this registration tutorial. We hope the information we provided was helpful. Have a great day.
Award-winning PDF software


Dd 2875 aug 2025 fillable Form: What You Should Know
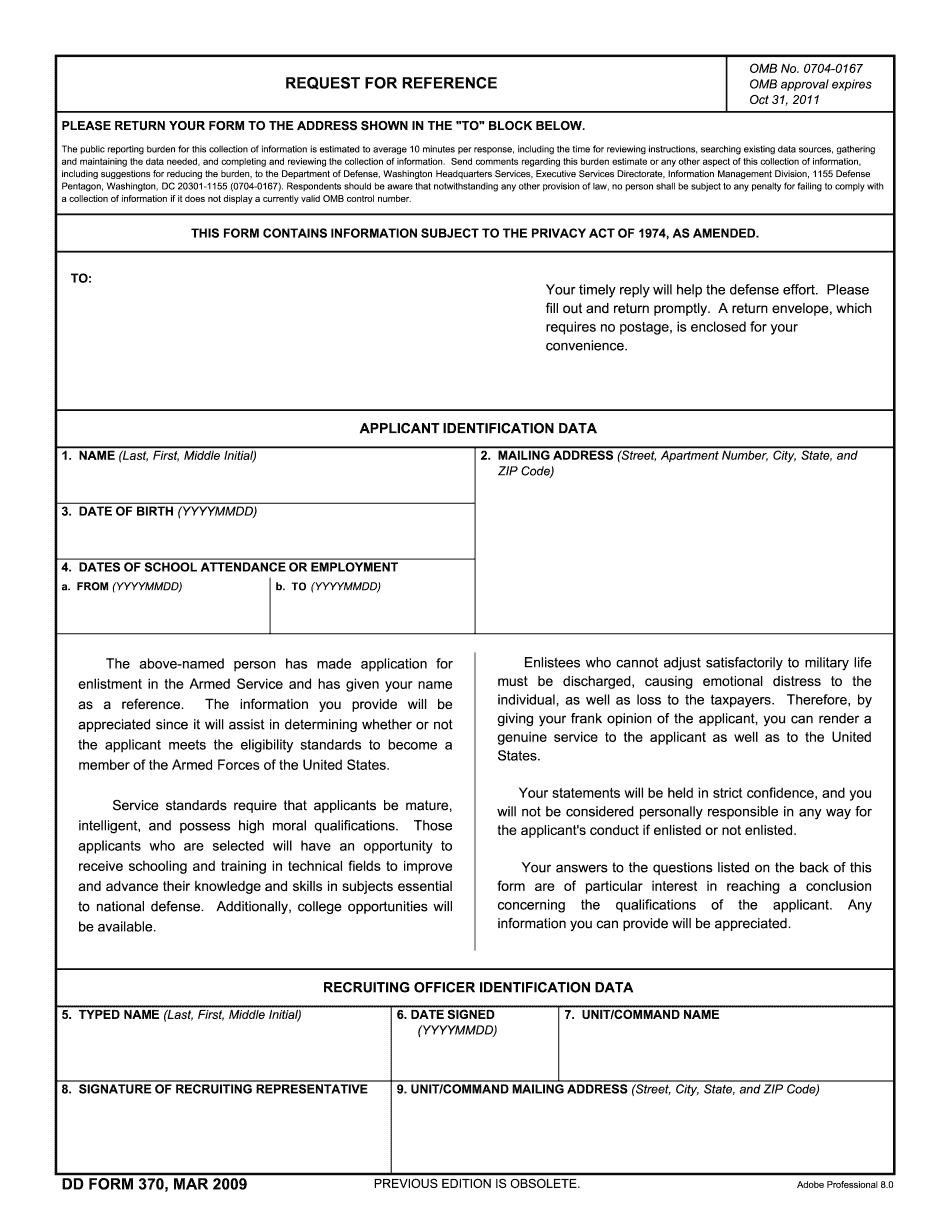
Identify. (a) Name. (b) Home Address (and if different, a city, state/province, or ZIP code). Work Address. (d) Phone Number. (e) Email or Internet Address for each person you are authorizing to have access to the system. 2. Provide Identity (i) Social Security Number (SSN), (ii) Date of Birth (DOB), (iii) Employer Social Security Number (ESN), if applicable, (iv) Home Address, (v) Home Phone Number, (vi) Credit Card Number, (vii) Loan Holder Name, (viii) Loan Date of Birth (or DBA), (ix) Amount paid by the individual to the lender, and, on behalf of each loan holder who has signed a copy of the DD 2875 (DD FORM 2875, FORM 2875A, FORM 2875B, FORM 2875C), verify that the loan holder's signature at the bottom left-hand corner of the page is the same as that of the loan holder; and (xi) Signature of all individuals who are authorized to have access to the system (in order of priority according to date and number of access requests received or approved); (xii) The name, postal code if known, and, if applicable, home address(BS) of any individuals who are designated as non-signatories; (e) Name and EIN (if applicable); and (f) Date of birth for each individual who wishes to be granted access to the system and to their DD Form 2875. Do not include all the information for a single individual. (g) If the individual has a DD Form 2875 with the number of accesses you have granted. 3. Security Classification. (a) Secure Access- Class 4 and/or Secure Access- Class 3 (See ). (b) Personal Information- Class 2 (See ). In addition to the instructions in DD Form 2875, AUG 2009, the person to whom personal information will be issued requires access to Secure Access- Class 4 and/or Secure Access- Class 3. 3.a. Personal Information.
online solutions help you to manage your record administration along with raise the efficiency of the workflows. Stick to the fast guide to do Dd 370, steer clear of blunders along with furnish it in a timely manner:
How to complete any Dd 370 online: - On the site with all the document, click on Begin immediately along with complete for the editor.
- Use your indications to submit established track record areas.
- Add your own info and speak to data.
- Make sure that you enter correct details and numbers throughout suitable areas.
- Very carefully confirm the content of the form as well as grammar along with punctuational.
- Navigate to Support area when you have questions or perhaps handle our assistance team.
- Place an electronic digital unique in your Dd 370 by using Sign Device.
- After the form is fully gone, media Completed.
- Deliver the particular prepared document by way of electronic mail or facsimile, art print it out or perhaps reduce the gadget.
PDF editor permits you to help make changes to your Dd 370 from the internet connected gadget, personalize it based on your requirements, indicator this in electronic format and also disperse differently.
Video instructions and help with filling out and completing Dd 2875 aug 2025 fillable